ZoomText Fusion Screen Reader – Home Edition
$1,540.00
All software purchases are available in digital download format only – per the manufacturer. We no longer ship a CD-Rom.
Need Help?
The ultimate accessibility tool
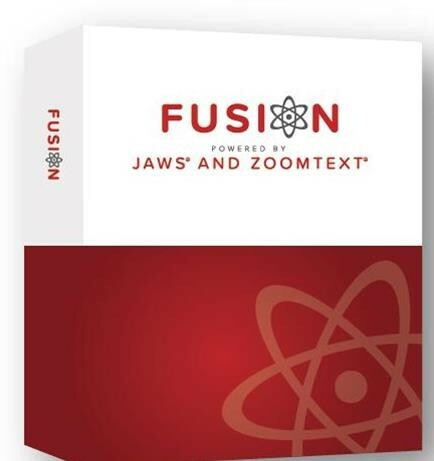
ZoomText Fusion is the ultimate accessibility tool for schools, agencies, training centers, and businesses where individuals with vision loss are served. Fusion provides the best of both worlds – ZoomText®, with its screen magnification and visual enhancements for screen viewing ease, coupled with the power and speed of JAWS® for screen reading functionality. A single installer and one license give you access to both ZoomText and JAWS individually, or together when run as the combined solution – Fusion.
By blending ZoomText and JAWS together, Fusion has flexible, high-quality speech using Eloquence and Vocalizer Expressive, powerful keyboard access including navigation on the web, and a wide range of customization options. Fusion is the perfect solution for schools, agencies, training centers, and businesses where individuals with vision loss are served. A single installer and one license gives access to both ZoomText and JAWS individually, or together when run as the combined solution – Fusion. Fusion is available in two versions: Professional and Home. A Professional license is used by schools, businesses, and other organizations. The Home version – for non-commercial use – is licensed to individuals for use on their personal computer.
What is a screen reader?
A screen reader is a software program that enables a blind or visually impaired user to read the text that is displayed on the computer screen with a speech synthesizer or braille display. JAWS, Job Access With Speech, is the world’s most popular screen reader, developed for computer users whose vision loss prevents them from seeing screen content or navigating with a mouse. JAWS provides speech and braille output for the most popular computer applications on your PC..
- Read documents. emails, websites and apps
- Easily navigate with your mouse
- Scan and read all of your documents, including PDF
- Fill out webforms with ease
- Easy to use with Daisy formatted basic training
- Save time with Skim Reading and Text Analyzer
- Surf the net with web browsing keystrokes
Features
Flexible Magnification
Full range of magnification levels up to 36x (up to 60x in Windows 8). Levels include: 1x to 8x in steps of 1, 10x to 16x in steps of 2, 20x to 36x in steps of 4, and fractional powers of 1.25x, 1.5x, 1.75x and 2.5x. 30 levels of magnification in ZoomText 10.1: 1x to 2x in steps of 0.2; 2.25x, 2.5x, 2.75x, 3x, 3.5x, 4x, 4.5x, 5x, 6x, 7x, 8x; 10x to 16x in steps of 2; 20x to 36x in steps of 4; 42x, 48x, 54x, and 60x.
xFont Magnification
xFont technology displays high-definition text that’s easy to read at all magnification levels. Smooth, bold, and condense settings allow you to fine-tune the thickness and spacing of text for added legibility. With other screen magnifiers, the clarity of text is degraded in the magnified view. As a result, many fonts (text characters) are difficult to read, including small fonts, serif, and italic fonts, and cursive fonts. With ZoomText’s revolutionary ‘xFont’ technology, you’ll see amazingly clear text at all magnification levels. All types and sizes of text are displayed with high-definition clarity, in all of your applications. Once you’ve seen xFont, no other screen magnifier will do.
Automatic Document Reading
ZoomText’s AppReader automatically reads documents, web pages and email within the parent application. ZoomText’s DocReader reads documents in a special environment where text is reformatted for easier viewing. ZoomText offers a variety of tools for quick and easy reading of documents, web pages, and email. Each of these tools has unique characteristics that lend themselves to particular reading tasks.
AppReader
AppReader reads documents, web pages, and email, within the parent application. As you enter and exit AppReader your view of the document does not change, providing quick and seamless transitions between document editing and reading. AppReader can automatically read through the entire document, or you can manually read by word, line, sentence or paragraph. As reading occurs, each spoken word is highlighted. AppReader settings allow you to customize the appearance of word highlighting, including the highlight shape, size, color, and transparency level.
ZoomText Magnifier Features
Includes all of the features of ZoomText Magnifier
ZoomText Fusion System Recommendations
To use Fusion for Windows, we recommend a personal computer running Microsoft® Windows® with the following:
- Operating System: Windows® 11, Windows 10, Windows Server® 2019, and Windows Server 2016.
- Processor speed: Recommended: 2.0 GHz i7 dual-core processor.
- Memory (RAM) Recommended: 16 GB.
- Required Hard Disk Space:
- 2 GB with more space required for additional voices.
- Recommended: SSD drive.
- Video: Video/Graphics card or integrated graphics with support for DirectX 11 or later.
- Sound: Windows compatible sound card (for speech).
- Display: 5-point multi-touch display for touch screen support.
ZoomText and Fusion 2024- March 2024 Release Notes
Increased xFont Support for ZoomText and Fusion
We continue to make improvements to xFont, our advanced font smoothing technology. In our December 2023 update, we introduced xFont support in Office 365 apps as an Early Adopter Program feature. In our March 2024 update, xFont is no longer under evaluation and is now on by default. In addition, you can now experience xFont in the following areas of ZoomText and Fusion:
- Toolbar text and icons
- Settings dialog boxes
- Messages and notifications
- Tools such as AppReader and Background Reader
More Office 365 Support
In addition to supporting Word 365, Excel 365, and Outlook 365, xFont is now available in PowerPoint 365 and OneNote 365.
Important: When using xFont, make sure to start ZoomText first before starting your Office 365 app.
xFont Bold
Bold text can improve readability for some individuals by providing additional contrast.
xFont Bold is a ZoomText and Fusion setting that adds boldness to text displayed in the following areas:
- Text and ribbons in Office 365 apps
- Screen Enhancement Settings, Voice Settings, and Preferences Settings in ZoomText and Fusion
- Windows desktop
You can quickly turn xFont Bold on and off using two new keystrokes:CAPS LOCK+B and the layered keystroke CAPS LOCK+SPACEBAR, M, B. Feel free to enable xFont Bold to see if it improves readability for you.
One thing to keep in mind is that apps like Teams, WhatsApp, and Outlook use bold text to identify unread messages. Also, some documents use bold to emphasize specific text. When xFont Bold is enabled, all text appears as bold, and you will not see a difference until you turn it off using any of the new keystrokes.
Seamless Updates for xFont Support
To ensure the highest quality of text displayed, especially with evolving versions of Office 365 and other apps, occasional fine-tuning of ZoomText and Fusion is needed. The Seamless Updates feature is one way to implement these adjustments in the background.
By default, ZoomText and Fusion now check for and automatically apply updates for xFont support. When Seamless Updates are disabled, updates for xFont support are not installed.
To see if an update has been installed, do the following:
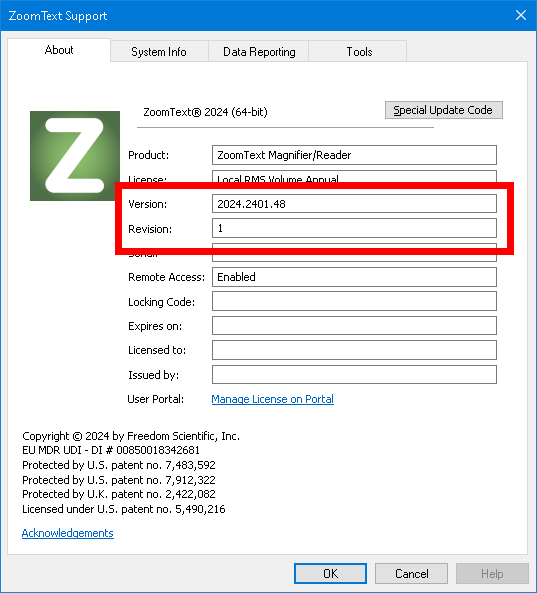
- In the ZoomText or Fusion menus, choose Help > About. The About dialog box opens.
- The Revision field shows if any updates have been installed.
- A value of 0 indicates no Seamless Updates are installed.
- A value from 1 through 9 indicates which Seamless Update is currently installed.
Note: The software version number will not change when a Seamless Update is installed.

To disable Seamless Updates, do the following:
Note: You must have administrative privileges to disable Seamless Updates.
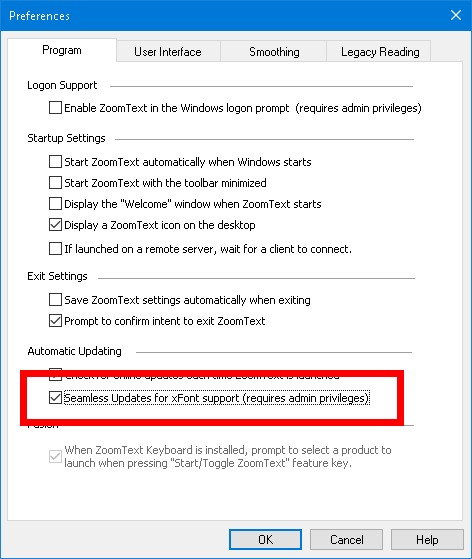
- In the ZoomText or Fusion menus, choose Preferences > Program. The Preferences Program dialog box opens.
- In the Automatic Updating group, clear the “Seamless Updates for xFont support (requires admin privileges)” check box.

Fusion Screen Shade Enhancement
The Screen Shade feature for Fusion prevents others from seeing what you are typing or reading by turning your computer screen black. This level of privacy is useful when working in public environments. Also, for low vision users who take advantage of Fusion’s screen reader functionality, it can reduce visual distractions and improve concentration.
The status message “Fusion Screen Shade, Right-click to exit” has been added to alert visual users that Screen Shade is active. It displays for approximately five seconds on the screen when you move the mouse. Screen Shade remains active until turned off with a right mouse click, or Fusion is restarted. Being able to right-click is a fast and easy way to restore the screen if you accidentally turn on this feature.
Note: Screen Shade is strictly a privacy feature and will not increase the battery life on a laptop or tablet.
Turn the Screen Shade On and Off
If Screen Shade is on and your screen is black, right-click to turn it off and show your computer screen.
To turn Screen Shade on and off, do one of the following:
- In the Fusion menu, choose Screen Shade
- Press INSERT+SPACEBAR followed by the F11 key
- Triple tap with three fingers on a touch screen
Note: If you are using a tool such as AppReader, it will stop reading when Screen Shade is turned on or off. To resume reading, you must restart AppReader.
Bug Fixes in March 2024 Update
Word 365
- Resolved an issue where xFont in Word documents was lost when switching between multiple monitors.
- Resolved an issue where xFont was lost when switching between Print Layout and Web Layout views.
- Resolved an issue where items in the File menu were not displaying in xFont.
- Resolved an issue where text in a document would only display in xFont when Word’s zoom level was set to 100 percent.
- Resolved an issue where xFont was missing from several areas in the Backstage view, for example, the Account, Info, and Feedback pages.
Excel 365
- In Excel, there were several fonts that did not display using xFont. These same fonts in Word do display using xFont. This issue has been resolved.
Outlook 365
- Resolved an issue where xFont was missing in the Mail, Calendar, and People windows in Outlook.
Teams
- Resolved an issue where the Teams app would display as a black window after restarting ZoomText or Fusion.
Firefox
- Resolved an issue where mouse echo was not working properly on Yahoo.com.
ZoomText
- If multiple users access ZoomText on the same computer, xFont will not display for all users until the computer was rebooted. This issue has been resolved.
- Resolved an issue where cursor enhancement settings were not migrated correctly when installing ZoomText 2024 over an existing installation of ZoomText 2023.
- When ZoomText is set to Korean, the keyboard echo would announce characters in English instead of Korean. This issue has been resolved.
- Resolved an issue where ZoomText was not reading correctly in NotePad Pro and Notepad++.
- Resolved an issue where the Windows Snipping Tool would not open after pressing Print Screen or WINDOWS Key+SHIFT+Swhile running ZoomText
- When you change the ZoomText user interface to another language, it no longer takes 10-15 seconds for ZoomText to close and restart in the newly selected language.
- Resolved an issue where Chinese and Japanese text was not displaying in xFont in multiple ZoomText dialog boxes, for example, FS Support Tools, Script Manager, Screen Enhancement Settings, and Preferences Settings.
- Resolved a memory leak issue that was observed when adding or removing monitors connected to a computer while running ZoomText on Windows 11.
- When the ZoomText Display Adapter setting was set to Compatibility mode, adding and removing monitors would disable magnification. The workaround was to change the setting or restart ZoomText. This issue has been resolved.
- If Desktop Window Manager (dwm.exe) was running, and you switched the ZoomText Display Adapter setting to Compatibility mode, adding or removing a monitor would cause one of the monitors to freeze. This issue has been resolved.
Software Updates
- <Click Here to access ZoomText 2024.2310.25> (16.7 MB)
- <Click Here to access Offline Installer – ZoomText 2024.2310.25 (653 MB)
- <Click Here to access Fusion 2024.2310.13 (16 MB)
- <Click Here to access Fusion Offline – 2024.2310.13 (1.6 GB)
- <Click Here to access updates for August 2023>
- <Click Here to access updates for June 2023>
- <Click Here to access updates for April 2023>
- <Click Here to access June 2022 Release>
- <Click Here to access February 2022 Release>
- <Ckick Here to access December 2021 Release>
- <Click Here to access November 2021 Release>
- <Click Here to access July 2021 Release>
- <Click Here to access May 2021 Release>
- <Click Here to access April 2021 Release>
- <Click Here to access February 2021 Release>
- <Click Here to access January 2021 Release>
- <Click Here> to access 2021 Pre-Release>
- <Click Here> to access August 2020 Update>
- <Click Here> to access the April 2020 Update>
- <Click Here> to access the March 2020 Update>
- <Click Here> to access the February 2020 Update>
- <Click Here> to access the June 2019 Update>
- <Click Here> to access the August 2018 Update>
- <Click Here> to access the May 2018 Update
Product Manual
No user manual found.About New England Low Vision and Blindness
New England Low Vision and Blindness uniquely brings hope through technology, training, and care. We are a full-service assistive technology rehabilitation training provider. We offer nearly 100% of all major electronic low vision, blindness, and software products, multiple assistive technology showrooms and a team of Vision Technology Rehabilitation Trainers to help anyone who is visually impaired.
We provide ‘patient choice’ showcasing numerous technology options from the world’s most respected suppliers, all in line with one’s individualized budgetary limits and personal, educational, or professional goals. We also provide custom training solutions and troubleshooting support.
Widely known, tested, and trusted throughout New England, our team brings 75+ years of low and blindness vision experience. Our talent, technology, and training offerings are unmatched and highly respected. We are an extremely unique and extraordinary resource for anyone suffering from vision loss in New England. We are here to help.
Through our no-obligation demonstrations - either at one of our conveniently located assistive technology showrooms or in their home, office, or school - clients experience a relaxed 2-hour no-obligation personal demonstration of almost 100% of all low vision and blindness technologies available on the market.
To learn more about how we Bring Hope to people who are blind or with low vision, contact a Technology Specialist at New England Low Vision and Blindness please call our toll-free number 888-211-6933 or email us at info@nelowvision.com. You can also use the form above to request information about our services or a no-obligation demonstration on this or any of our products.


