Assistive Technology for Students with Low Vision: A Teacher’s Guide

You have a student with low vision on your roster, and you want to get this right. Maybe the paperwork says “screen magnification” or “CCTV” and you are not sure what those are, or whether the device sitting unused in the corner is even the right one. That uncertainty is normal, and it does not mean you are behind.
Here is the one thing to hold onto: assistive technology only has to do one job, which is to give your student the same access to the lesson that everyone else already has. When you understand what each tool is for, choosing and supporting it gets a lot less intimidating. This guide walks through the technology you are most likely to see, how it fits into a real classroom, and where your role actually begins and ends.
Start With the Job, Not the Device
The most useful question is not “what technology does this student need?” It is “what is this student trying to do, and what is getting in the way?” A student who can read enlarged text on a screen has a different need than a student who reads with their ears through speech, and a different need again from a student learning braille.
Assistive technology for a visual impairment in the classroom falls into three rough tiers, and the best answer is often the simplest one that works.
Low-tech tools cost little and fail rarely: handheld magnifiers, large-print worksheets, bold-line paper, high-contrast markers, a slant board, and good task lighting. Do not skip past these because they look basic. For many students with low vision, an 18-point large-print handout and a window seat solve more problems than a thousand-dollar device.
Mid-tech tools add power without a full computer: portable electronic magnifiers, audio recorders, a tablet with the right accessibility settings, or a scanning pen. High-tech tools are the software and hardware most people picture, including screen readers, screen magnification software, refreshable braille displays, and desktop video magnifiers. The tier a student lands in depends on their functional vision, their reading medium, and the task in front of them, not on their diagnosis alone.
Who decides which tier is right? Usually the teacher of students with visual impairments (TVI) and an assistive technology specialist, working from an evaluation. Your job is not to prescribe the device. Your job is to notice what is working, flag what is not, and make sure the tool the team chose actually gets used.
Screen Readers in the Classroom
A screen reader converts on-screen text, menus, and buttons into synthesized speech, and it can also send that text to a braille display. Students who cannot read print visually, even when it is enlarged, use one to navigate a computer entirely by keyboard and audio.
The names you will hear are JAWS and NVDA on Windows, VoiceOver on Mac and iPad, and ChromeVox on Chromebooks. JAWS is the long-standing paid standard, NVDA is free and open-source, and VoiceOver and ChromeVox come built into the devices your school may already own. A student who uses a screen reader typically has it running all the time, so treating it as “always on” is the right mental model.
Here is the part that lands on you as the teacher: a screen reader can only read what is accessible. A PDF that is really a scanned image reads as nothing at all. A worksheet built as a picture of text, a video with no captions or description, or a website that only works with a mouse will all stop a screen reader cold. Providing digital materials with real, selectable text is the single highest-impact thing a general education teacher can do for a screen reader user.
When something is not working, the usual culprits are boring and fixable: the document is an untagged PDF, the file was shared as an image, or a keyboard shortcut got toggled off. Loop in the TVI for anything beyond that.
Screen Magnification Software
Screen magnification enlarges what is on the display and can boost contrast and change color schemes at the same time. It suits students who read visually but need text larger or bolder than standard display settings allow.
The built-in options are Magnifier on Windows and Zoom on Mac and iPad, and both are free. Built-in magnifiers generally reach about 400 to 500 percent, or roughly four to five times the original size (Perkins School for the Blind). Dedicated software such as ZoomText goes much further and adds features like smoother tracking and a magnified cursor, which is why some students use it instead of the built-in tools.
In practice, magnification changes how fast a student works. Enlarged text means less of the page fits on screen at once, so reading and scrolling take longer. Build in extra time for magnification-dependent tasks the same way you would for any accommodation, and check that your slides and documents use a clean, high-contrast layout, because magnifying a cluttered page just makes the clutter bigger.
Some students combine magnification with speech, following along visually while the text is read aloud. That is a feature, not a crutch, and it often reduces eye strain over a long assignment.
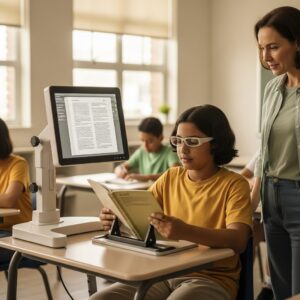
CCTVs and Document Cameras
A CCTV, or video magnifier, is a camera and screen that magnifies whatever you place under it, with adjustable size, brightness, and color modes. Desktop models sit at a student’s workspace for reading and writing; portable and handheld models fold up for moving between rooms. Despite newer software, CCTVs remain the go-to for printed material a student cannot get digitally, from a lab handout to a permission slip.
Document cameras play a related role for the front of the room. When you display work under a document camera, a student can view it enlarged on their own screen instead of straining toward the board. A student who cannot see the whiteboard from any seat is often best served by getting that content routed to a device in front of them, not by moving the seat again.
For classroom routines, the two things that matter are position and glare. Keep the CCTV where the student can reach it without disrupting the flow of class, and watch for overhead lighting washing out the screen.
Text-to-Speech Tools
Text-to-speech reads digital text aloud on demand, which is different from a screen reader. A screen reader is a full navigation system for students who work non-visually; text-to-speech is a lighter tool that any student can trigger to hear a passage, then turn off. Built-in versions include Read Aloud and Narrator on Windows, Speak Selection on Apple devices, and Select-to-Speak on Chromebooks.
For coursework, the bigger win is accessible books. Services such as Bookshare and Learning Ally provide textbooks and literature in audio and other accessible formats for students with a qualifying print disability. If your student spends the first ten minutes of every reading assignment just trying to decode the page, an accessible copy of the same book changes the entire lesson.
Text-to-speech complements magnification and screen reading rather than replacing them. Many students move between all three across a single school day, depending on the task and how tired their eyes are.
How Classroom AT Gets Chosen
Under the Individuals with Disabilities Education Act (IDEA), every IEP team is required to consider a student’s need for assistive technology devices and services (20 U.S.C. 1414(d)(3)(B)(v)). “Consider” is a legal floor, not a ceiling, and a good team goes well past it with an actual AT evaluation that matches tools to the student’s functional vision, age, and curriculum.
Two parts of that process quietly decide whether the technology succeeds. The first is a trial period. A device that looks perfect on paper can be wrong in a student’s hands, and trying before committing prevents an expensive tool from becoming the one gathering dust. The second is student buy-in. Technology only works if the student actually uses it, and a middle schooler who feels singled out will leave a device in the bag no matter how capable it is. Giving students a real say in what they use is not a courtesy; it is the difference between adoption and abandonment.
Funding usually comes up here too. Districts, state assistive technology programs, and grants all play a part, and NELVB keeps a running guide to assistive technology funding options so teams do not have to start from scratch. The other piece worth writing into the IEP is a goal for AT proficiency, so the plan covers not just owning the device but learning to use it well.
When Classroom AT Is Not the Answer
Assistive technology is not always the fix, and pretending otherwise wastes a student’s time. If a student has never had a functional vision or learning media assessment, the honest first step is that evaluation, not a device catalog. Buying hardware before you know how a student reads best is guessing with a budget.
Sometimes the barrier is not the student’s tools at all; it is the material. If your class content is inaccessible, no screen reader or magnifier on the student’s end will fully rescue it, and the real fix is on your side of the desk. And plenty of the time, a low-tech answer beats a high-tech one: a student who reads comfortably with a handheld magnifier and large print does not need a five-figure system to prove the school tried. More technology is not more support. The right technology is.
Supporting AT in Your Classroom Day to Day
Once the team has chosen the tools, the daily reality lands with you, and most of it is not complicated. Make sure devices are charged and stored where the student can get to them, because a dead battery cancels the accommodation just as surely as never having the device. Learn the two-minute basics of restart, check the settings, and update the software, so a frozen screen does not cost a whole period.
Normalize the technology out loud. When AT is treated like a routine tool, the same as a calculator or a pair of glasses, classmates follow your lead and the student stops feeling like an exhibit. Build in extra time for AT-dependent tasks, and know the line between what you can solve and what belongs to the TVI. You are not expected to be the technology expert. You are expected to keep the tool in play and to call for backup when it breaks in a way you cannot fix in a minute.
Take the Next Step
The right assistive technology turns a lesson a student was locked out of into one they can join on equal footing, and you do not have to build that system alone. NELVB provides assistive technology assessment, training, and ongoing support for schools, teachers, and IEP teams working with students who have low vision.
If you are trying to sort out what a specific student needs, or you want a second set of expert eyes on the tools already in your classroom, No obligation consultation with our low vision technology team.
Related Resources
- Explore the full range of assistive technology solutions for low vision.
- See our roundup of low vision products for schools and educators.
- Review the guide to assistive technology funding options for students.
- Learn how technology supports independent living skills beyond the classroom.
Frequently Asked Questions
What assistive technology do students with low vision use in the classroom?
Students with low vision use a mix of tools matched to how they read. That commonly includes screen magnification software, video magnifiers or CCTVs, screen readers such as JAWS or NVDA, text-to-speech, and low-tech supports like large print and handheld magnifiers. The right combination depends on the student’s functional vision and the task, which is why an assistive technology evaluation drives the choice rather than the diagnosis alone.
Who is responsible for setting up assistive technology in the classroom?
The teacher of students with visual impairments (TVI) and an assistive technology specialist lead the evaluation, selection, and training. The general education teacher’s job is to keep the technology working day to day: providing accessible digital materials, allowing extra time, handling basic troubleshooting, and flagging problems to the TVI. Under IDEA, the full IEP team is required to consider the student’s AT needs.
Does the school have to pay for a student’s assistive technology?
If the IEP team determines a device is needed for a student to access their education, the district is responsible for providing it, and families should not be charged for required school AT. Funding can also come from state assistive technology programs and grants. NELVB’s assistive technology funding guide outlines the common sources for students and schools.